jueves, 1 de febrero de 2018

Cartoon Monkeys


When I conceived the cartoon monkeys, I was thinking more into machinimia than other stuff, like, making some animations for the monkeys and release some video from time to time, because I liked the way to express into a cartoony way some of the issues of life, like... studying arts and deal with finances


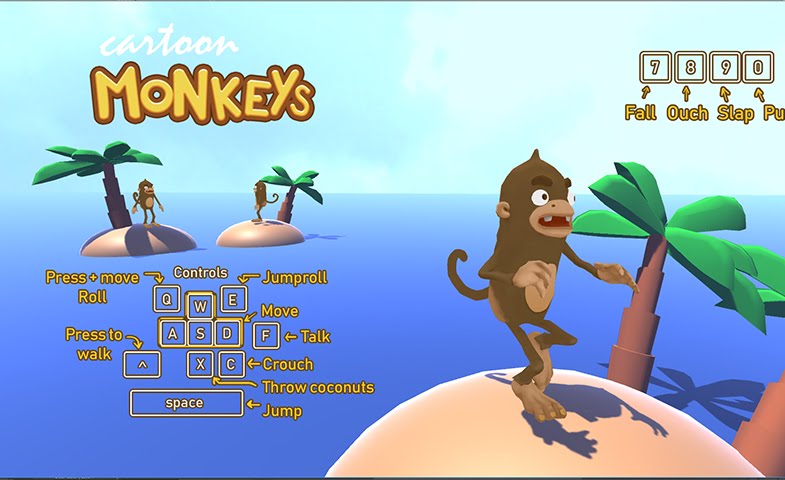
Third person character control:
So, what I did for this project, was to prepare a character, based on what I learned working at Many Worlds and working for the golems from Fluzo Studios.

When you prepare a character in Unity, be aware you would need a couple of things,
In this Third Character control, you have to know into the Animation window, you will have some bricks wich represent different states for the monkey.

The first one is called Grounded, wich is telling what would happen to the monkey if it touches the floor and you control it with the WASD keys, so this first Tree, you wold see something similar into the animation window


If you click on the Grounded brick, you will find in the inspector the first image, wich is telling you, you are getting into a Blend Tree, wich if you double click on the inspector, will tell you, you are into a 2D freeform Cartesian system, wich is blending different animations, depending on the parameters wich are set for the third person character control, in this case, turning the monkey clockwise or the opposite.


At this point you will realise, animations are a quite complicated issue when you have to mix-up some different variables, like how fast you want your character to answer to your input controls, and that's a different thing from how fast or slow would your character execute the different animations.

(And that's just for the grounded state of the monkey)

Following that, you will check the different arrows wich are coming or going from one site to another different one, in this case, mixing between OnGround and Jump parameter, wich are parameters coming from the original Third person character control


For different animations, you can always add more by using the component added to the Monkey, wich is called Input Manager, there you can create a key input and then use it within the monkey blend tree, and create some changes between animations like, being hit, throw a coconut, or slap. Wich if you check the different arrows, this just needs from a single condition, or at the most, two conditions, wich are comparing if the monkey is moving or not.


Then, you can check the different mask layers wich are telling the monkey how to blend when it is doing different things, At this point, there are interesting properties, wich allows you to make the monkey talk while this monkey is doing other stuff, the animation will override or blend with the old one.


At this point I think you would be able to mix some more animations within this controller, so, if you want to add some more animation, you can take a character (wich his animation set is prepared for humanoid) and then put it into the blend tree.

About throwing coconuts

Throwing coconuts is more complicated than this other stuff before, so... thanks to a script extended to me from MW, allows you to throw a rigid body from a position, triggered by an event scripted into the throw animation of the monkey (there are two, because the monkey can throw coconuts when it is standing still and when it is in movemnent) So, the script is triggered by a command 'Shoot' wich is at some specific frame on this animation, and then create an instance of the coconut, and after that it moves it back to the throw point... so you are throwing the same coconut all the time.

Two main different character controllers

Take notice, there are two different Character controllers, one is prepared with static animations, wich allows you to check on the video the different animations, and the other one is the one that we were talking first, the one wich allows you to have the monkey moving, rolling and jumping around.


I want to share with you some concepts I did, wich were focused on making some comic or maybe machinimia, wich you can also produce. Just know that you have to animate from an humanoid character and all the info shared between bones from one and other avatar must work more than fine.


We hope you like this asset as much as we do, we included a lot of work on it, nice animations and a nice set-up for a fair price


And then, the disclaimer

Please consider that I am not a programmer and the main energy on this asset is invested on the cartoon art, the animations and also blending all of those into this concept. you may experience some issues with colliders, wich are well known to be a pain in the ass with Unity, wich you have to program first to create a better experience on your game. This require refinement and a lot of work and our limit gets to this point.

Also, the sounds that you can hear at the video are not included

miércoles, 17 de mayo de 2017

Modular Interior


Seems like I have in mind so many things about 'Modular' structures. But I think it is the right way to do, because when you have the modular structure, you can start to program a way to create the place itself.

I have been working at many places, and architecture is one of its kind, it is getting easier and easier to get VR, to get video for architecture interior or to project new spaces, just with few clicks, render and that's all.

This kind of tools are everywhere, nowadays, you can get complete scanned data from people, spaces, you always have to start from scratch when you try to create something nobody heard or nobody saw it before.

The tool:

This tool include a system where you can prefab anything you need. Start from a 5x5 units room, and from there, you can start modifying it, According to the planes you got.

I intended to make the UVs clean and easy. So, it always save the same structure, wich you can base your texture and models, change the materials, and everything would be right in place.

Mind the gap:

You could be thinking, ok, so, I get a modular structure, but then I start to have gaps between meshes, wich gives you problems, and that's right! But I can make a small tutorial about how to get rid of baking gaps, and also how to make a small trick, to get shadows right into Unity (wich is not easy because of the bias values, mostly)

What would I be able to do with this tool?

Having this 3D asset make things fast for VR, and realtime graphics! Don't hesitate to get it and request the main furniture or structure you are missing. We are open to make this tool big, so you don't have to buy several expensive Interior assets.


viernes, 7 de abril de 2017

Cathedral 1.0.4


1.0.4 - Update with more windows. colored windows. And we still work on the prefabs and more upcoming assets!


https://www.assetstore.unity3d.com/#!/content/81894

So, what you can find into the asset is quite clear. You will receive like.. 45 or more prefabs (all with those pivots in place, you know? Because it's better to work this way)

With those prefabs, you can build any, and I mean ANY level you can imagine, so, the idea is to create some sort of blocks, wich are size of 1.. 2 units. And you even can place them by scripting. Like.. just moving and rotating pieces around, and them, you won't see the seams. Wich is kind of difficult, when you work on enviroment and small modules, right?

Under this text, you can see, one level.. then the camera view from the inside.


And then, some "messy" view of the level, wich is made out of those blocks, wich you can place, select and do whatever you want. but from the inside would be like the image under it.


The "difficult" part would be the illumination, wich is not difficult at all.
You have indirect illumination, wich comes from emmisive cubes, those emmisive cubes can be hidden after baking the scene. (It is the most recommended way to illuminate a level)

Then, you will need to place some Reflection Probes, so.. you can see the white/color reflection at the floor on the image above. Also, keep in mind, if you use Deferred lighting, you can blend the reflection from different probes, is how we get the result you see.

And.. finally, to make the moving characters in the scene, or moving pieces (wich can be just the doors) you need to bake the Light probes, wich those.. tell you if a character gets illumination between probes, more light or less light from this space. And those need to be placed all over the place, where the character can move. (No need on the ceiling.. unless it can fly around or jump quite high)

If you are using smartphone end.. then, you want to use illumination less expensive, probably get to rendering path: Forward. Wich does not allow to blend the reflection probes (as one of the multiple things you cannot do)

Best recommendation to make the light of the scene

Keep it simple!

Start from the beginning. If you don't know what is going on on the light of the scene, then.. hide or deactivate things. Light sources.. wich are also reflection probes.

Now is a bit simple to see that on Unity 5.6 But.. you know? It got messy when they changed the names inside, and then you have to differenciate between light engine, lighning path, now the way of shadowing... My advice, is to get comfortable with the basic stuff, then try to add another thing. And try not to add something you don't know what is doing at the scene, this means, learn how to use it, if you want to use it, probably you won't apply it properly and make the scene go slower. That means.. study! And.. simplify

Color path? I don't know why they put the option.. they recommend to use the default one to get more public. It is hard to learn something when the people just throw the things inside and tell you to use it, without knowing what is going to happen at the mobile of.. who knows, mixed with.. another thing wich is new as well... Keep it simple, then, you will start to learn!

viernes, 31 de marzo de 2017

Modular Cathedral - Updates from 1.0.3 - 1.0.4


Hi!

I guess you are wondering, Should I buy the Modular Cathedral? or should I wail till it is fully completed?

I have to say, at the moment, just with half month for Modular Cathedral and it is going quite well! That means, you will have more updates, it will be processed more often and you will have a powerful asset to cover some of your requirements for your game.

What do I want to achieve?

If you saw the last post... I tried to explain, how I liked Dark Souls saga, and how I learned from Diablo I, modular and procedural levels are quite good for gaming experience.

Having this in mind. What I try to achieve, is to create different modules wich can be rotated, moved and copied several, several times! So you can create a gigantic, labyrinth level with no trouble. Even, if you are interested to know how light is baked, I can explain it a bit here.

If you paid attention to the process of doing the asset, I am using a regular basis, you can find blocks with 1x1 unit size and some others of 2x2, 2x1 wich can be used, rotated and translated in the best display you want.

At the last update, I made some effort to create steps and stairs, so you can have different ways to create height and transitions from one floor to another. Wich can be useful (Diablo I style.. where you just went down each floor, trying to find the different big doors)

This way, you can create infinite rooms, wich are fitting together, no gaps between them, and they can be created during runtime (if you have the skill to do that, but I guess it would be without baking)

Also, I try to illuminate the scene with indirect lighting, that means, you have to bake the light and wait for.. 10 or 20 min, depending on the computer, and then you will have those lights, also, you have to keep in mind, you need the Reflection probes to show the specular on the surfaces, and also use the Light probes to "light" moving objects during runtime.

You can see, we added some candle tables to make the Indirect baking look like... it is doing the thing there. but the real stuff means, you bake the light first, you place the candles afterward.

At the newest update (wich I will submit with more prefabs.. still pending the upload to the asset store) some color is given by the indirect light of colored windows, wich they need some Reflection probes to work properly. Probalby you can add some effects on a direct light, or some volumetric light as well, wich are not given by default in Unity, but you can build it afterwards. (working on that...)

Place in mind, the multiple things you can achieve with this one. Also, I am going to upload more "samples" of different level designs wich can be achieved by this asset.


On the next update:


miércoles, 15 de marzo de 2017

Unity Pivot Nightmares!

So, I think we are all familiar with pivot issues in Unity. I can Imagine how difficult it has to be, to make a standard way for 3D, when different programs have completely different system of coordinates.

We have two main issues by working with 3D

1st - Is the Universal problem between inches and the metric system. So, you get familiar with these numbers: 2.54 or 0.00254

¿What are those? The difference between inches and cm.

2nd - Is the problem between programs. Z is up or Y is up.. wich are the two most common, Y up is based on Autodesk Maya, and then, if you use 3Dsmax, you get Z up, and lots of problems with it. also if you use Blender, you will get similar problems

¿The answer?

How to achieve stuff out of 3Dsmax


My experience is... when you export FBX, every setting of units you write on scene are overwrited by the FBX export options, so, you just have to take care of FBX export options, and become an expert on that.


There you can achieve two things in Unity, file scale conversion on one or other part of Unity, one (the one wich comes from the program) is showing when you select an FBX at Unity, then the Scale Factor and File Scale can be 1:1 or 1:0.0254 (inches to meters) so, if I understood right, 3Dsmax uses inches, so you can se it to export on automatic or directly into inches.


If you try to get 1:1 from a FBX generated in 3Dsmax, then, you have the scale conversion on the objects at the scene, so, the transform - Scale value gets to 0.0254, wich will give you big problems.
I say this, because then, you have different scale conversions if you include parent-child relationship between meshes and helpers... and everything gets quite messy and difficult to understand, so... it is better to keep thing simple.


Your objective is to get 0.0.0. on you Transform and 1.1.1 on your scale values

Once you achieved 1.1.1 values on scale, then, you will encounter a problem with the rotation, wich will be resembled like -90 on X axis, and the Asset Store will be telling you the objects are not facing Z, what the... ? what? My objects are facing Z.. just they got this number.

So, what they mean, what they do.. is to reset all those values on the gear button at the top right of Transform values, then everything gets to zero, and the nightmare begins.

What to do?

The answer I got was, to get a Batch export script for 3dsmax, wich gives to you the option of exporting each object placed at 0.0.0 position, do the modifications you need, and reset these options to continue working on the meshes you were doing. So, I reset position and I have to rotate the object 90 degrees on X axis to avoid this 270 (-90) rotation of before. There you have an object with 0.0.0 rotation, but.. the problem is, now.. I have an object facing down.

Plus! To solve it totally you have to rotate the pivot on 3dsmax.. then, you have to rotate till it is like... this dummy I created... Imagine you are on Unity and you have to achieve these directions, then, you dont have much to do, rotate and batch export from the script.


I hope this solves the main issues you are having.. but I suppose this does not solve everything you could have doing an import, because sometimes are Unity bugs doing stuff into it. Like one related to include a point helper and parenting stuff into helpers... but that's quite complicated to explain.


https://docs.unity3d.com/Manual/HOWTO-importObject.html

https://docs.unity3d.com/Manual/HOWTO-ImportObjectMax.html

Modular Cathedral


Finally! We got to release the Modular Cathedral, the perfect enviroment for the Medieval Angel, so, we decided to make little modules to make possible different schedules.

Our inspiration? The classics and the new.

We remember when we first tried Diablo, and then the second Diablo game, those from Blizzard franchise, 3D was rendered with isometric modules, and those were programmed for being generated the "procedural way", so you were able to reach different enviroments, just by starting a new game, each time you played, you had to find the doors, find the monsters. Small modules on the game had the same structure, but you get the idea.


This way, I thought about making cathedral level, so you could get some sort of Diablo and my new favourite: Dark souls themed, wouldn't it be great to have procedural way to generate cathedrals and dungeons, with the system of play from Dark Souls? So, that was my inspiration to make this level design.

Features:

A building using the pieces I created for Modular Cathedral, wich is resembling an empty cathedral, where you can place everything you need on your game, you can use this part on your game without a problem, just we are working hard on the module part, so you can generate quite everything similar to this cathedral structure.


The modular built in:

So, we try to make the most sense on the modules/prefabs we are creating on this asset, so, soon you can see an structure like this one, wich will be in different pieces. So, this one will be pieced into 9 different prefabs, but also those parts could be with different variations, one just being a big wall, or with a big door, medium door, small door... And then, we can create corridors, bigger, wider structures, at the moment I am trying to make the first floor, and then I will continue making prefabs for wider, taller roofs. This takes a bit of time.. I will explain it in other post about pivot nightmares.


viernes, 10 de febrero de 2017

Full potential!


We have worked hard on this asset to look great! But still, some more tings are coming, we uploaded the new key images and the new video, and we have to clean the scene and more it more friendly. At the moment is still 1.2 (wich also includes the old Future angel and its shaders... it does get more, not less)

And a intense week doing the video, lots of hours invested on that, it looks quite better, quite like it is, but we think we can make better animations, though


If you still doubt if it worths being purchased, we tell you, you have to take the chance to have it for this price right now! Because we plan to add more angels to the pack, armored angels.

martes, 31 de enero de 2017

Plans, plans, PLANS!!

After releasing the Cathedral and the new Angel, we have been thinking about how to give the best result for Asset store sells.

So, first we thought about some price planning of those, so, If you see the cathedral now, it has almost no furniture but, some doors.

We plan to fill the space with some banks, candles and those kind of stuff.
Also a small door will be good for making some Diablo I dungeon like.

If it costs 11€ without VAT, it will be going 1€ up after upgrade! So we recommend you to buy the asset as soon as possible! We will give life to this shop.

This also goes for the Angel, but we know angels are quite unique form of asset and not many people are interested on it, more than enviroment. But the same rule for all the assets here.


Contact with us if you desire more information or if you have any question, suggestion or... if you want fresh sushi to be sliced!
saucysushishop<at>gmail<dot>com

Cheers!


jueves, 26 de enero de 2017

New images, cathedral and angel

So, basically, we upgraded the asset from Angel pack with some key pics with more resolution and better looking.


But, we have been working on the upcoming asset wich is going to be a modular way to produce cathedral looking levels, wich are inspired into the saga Dark Souls, wich I believe is one of your favourite as well.

We wanted to reproduce the way it looks, but also make it possible to use for smartphone app developers, who are also concerned about the low-poly and fast shader configuration, these images are Directx result though.

So, it comes with slow flow, but it comes steady, till Sushi shop gets it's first steps on the Unity Asset Store. We hope, lots of indie game companies likes it, because enviroment is one of the tough beast you have to control, and is quite expensive to produce them. But we like to make both, chars and enviro. We hope we can get some of your feedback and we are pleased when you enjoy our work!